So now we have our hardware it’s time to start installing ESXi onto our host and adding the 3 ESXi nested hosts (software hosts inside of ESXi).
Obtaining a copy of ESXi
First we need to download a copy of ESXi, you can get this from VMware but you will need to have a customer connect account (you can sign up for one). Browse to https://my.vmware.com/web/vmware/ and browse to Products and Accounts > Products > All Products. Under VMware vSphere Hypervisor (ESXi) click View Download Components. You can then select the version and download the required software:

I’m downloading version 7 as I want to try upgrading in the future. You may need to register for the software you want to download first. You should also get a license key that you should take a note of. You want to download the ISO image for the next part.
Building the installer key
Now you have the software you can use either of the following applications to make a bootable USB key with the ISO file:
Windows: Rufus – https://rufus.ie/en/
Mac: UNetBootin – https://unetbootin.github.io/
Installing ESXi
Finally we get to the installation. Insert the USB memory stick into the machine and upon boot, press the corresponding button for the boot menu and select your device.
NOTE: The initial installation of ESXi takes up 138 GB of space. As of ESXi version 7.0 U 1c, you can specify for a smaller installation (see this VMware KB). Due to space constraints in a homelab I will be using this to keep the installation to 69GB.
NOTE: This should only be used in a homelab where storage can be constrained. I would not recommend that you use this in a production installation.
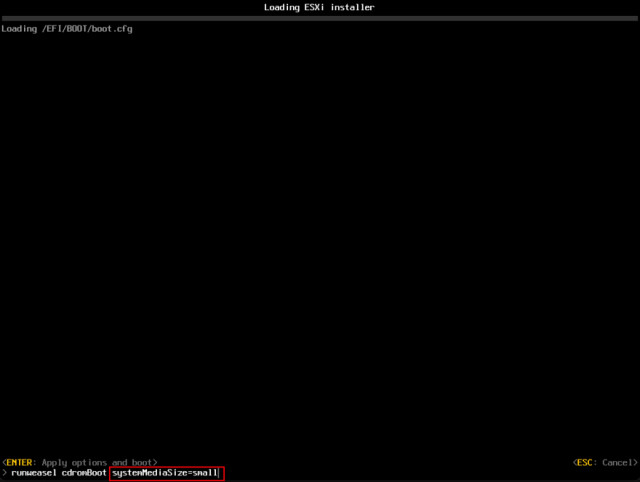
When you get to the screen below, press Shift + O:

At the prompt, after the section ‘runweasel cdromBoot’ type ‘systemMediaSize=small’ and press Enter:
NOTE: Other options are:
- min 33GB, for single disk or embedded servers
- small 69GB, for servers with at least 512GB RAM
- max all available space, for multi-terabyte servers

It should boot to the below screen if all goes well. Press Enter to continue:

Press F11 to accept the terms and conditions for the end user license:

The ESXi installer will then scan for storage devices connected the the machine:

Select the disk you want to install ESXi onto (in this case my 256GB drive) and press Enter to continue:

Select your preferred language and press Enter to continue:

Type a password that you want for your root password (and confirm it) and press Enter to continue.
NOTE: It’s worth making a note of this password as you’ll need it to log into the host later!

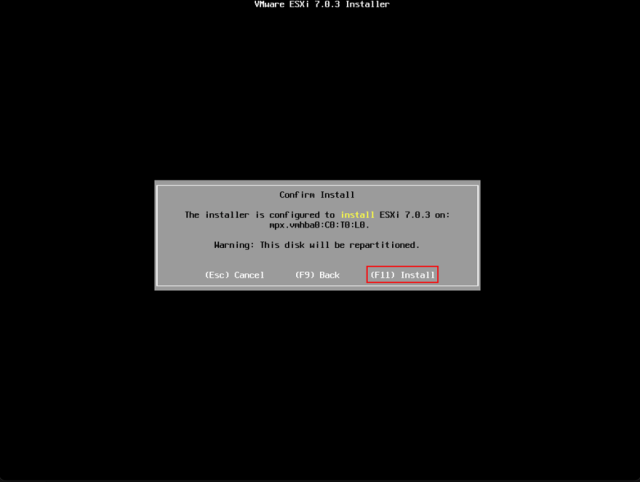
When you’re ready to install, press F11 to install ESXi:

The software will then go through the installation process:

Once complete you’ll be asked to remove the installation media and reboot. Remove the USB stick and press Enter:

Once rebooted you should be faced with the following screen:

That’s it! Installation completed. Now we just need to configure it.
Configuring and connecting to ESXi
Now we need to do some configuring of ESXi Press F2, enter your password from the previous steps and press Enter

Press down on the keyboard to highlight Configure Management Network

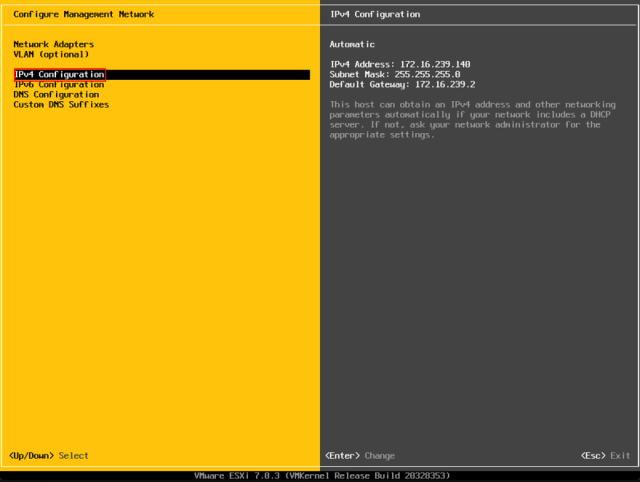
Press down on the keyboard to highlight IPv4 Configuration

Press down on the keyboard to highlight ‘Set static IPv4 address and network configuration’ and press the spacebar to select it. Press down and enter in an IPv4 address, subnet mask and gateway address (mine is set to use an IP address on my local network and the gateway is my home router). Press Enter.

You should be taken back to the Configure Management Network screen, press the down key on the keyboard and highlight ‘DNS Configuration’. Press Enter.

Press the down key to highlight ‘Use the following DNS server addresses and hostname:’ and press the Spacebar to select it. Enter your details for your DNS server (in my case my home router) and Google’s DNS service. You can also give your host a name from here. Press Enter.

You should be taken back to to the configure management screen

Press the Esc key and you will get the below prompt. Press Y.

Once again you’ll be taken back to the configure management network screen. Press the Esc key again.

You should be taken back to the main screen.

In a browser on a different machine (connected to the same network), type in the IP address that you gave your ESXi host. Click OK to any warnings (like below).

Enter the username ‘root’ and the password you set during the installation.

Untick (or tick) the ’Join the VMware Customer Experience Improvement Program’ and click OK

Click Manage, then the Licensing tab and then Assign license

Enter the license key (that you saved when you downloaded the ESXi iso at the beginning) and click ‘Check license’

If everything’s good you should get the below message. Click Assign license.

Click the System tab and then Edit NTP settings.

Select the ‘Use Network Time Protocol (enable NTP Client)’ selection and enter the following in the NTP servers field (or copy\paste):
0.uk.pool.ntp.org, 1.uk.pool.ntp.org, 2.uk.pool.ntp.org, 3.uk.pool.ntp.org
Change the NTP service startup policy to ‘Start and stop with host’. Click Save

Formatting disks in ESXi
If you have any further disk that you want to configure for use (in my case the 1 TB drive) you’ll need to do the following.
Click Storage, Datastore, New Datastore

Select Create newVMFS datastore and click Next

Enter a name for your datastore, ensure your storage device is selected and click Next

Make sure that full disk is selected, VMFS 6 is selected and click Next

Check the details and when ready click Finish

Click Yes to confirm the partition creation.

That’s it! next time we’ll configure the datastore and install the nested ESXi hosts.

